8. Exercise: Contributing a part descriptor via model fragments
: 8. 실습 : model fragments를 통한 part descriptor 기여
이 실습에서, part descriptor에 model fragment를 만들어봅시다. Eclipse IDE 나 RCP application의 extend에 사용할 수 있는 방식으로 이 part descriptor를 build 할 겁니다.
8.1. Create a new plug-in : 새 plug-in 만들기
Create a simple plug-in project named com.vogella.contribute.parts. The following description abbreviates the plug-in name to the contribute.parts plug-in.
이름 com.vogella.contribute.parts로 새 simple plug-in project를 만드세요. 이후의 description은 the plug-in name을 contribute.parts plug-in로 축약합니다.
8.2. Add the dependencies : dependencies 추가
In the MANIFEST.MF file, add the following plug-ins as dependencies to your contribute.parts plug-in.
MANIFEST.MF 파일에서, 아래의 plug-ins를 contribute.parts plug-in의 dependencies로 추가하세요
org.eclipse.core.runtime
org.eclipse.jface (which also provides org.eclipse.swt)
org.eclipse.e4.core.di
org.eclipse.e4.ui.workbench
org.eclipse.e4.ui.di
Also add the following package dependencies.
: 아래의 것을 package dependencies로 추가하세요
javax.annotation
manifest는 파일에 아래처럼 되어 있어야 합니다.
버전 숫자는 빈번히 번경되기 때문에, 삭제되어 있습니다.
Manifest-Version: 1.0
Bundle-ManifestVersion: 2
Bundle-Name: Parts
Bundle-SymbolicName: com.vogella.contribute.parts
Bundle-Version: 1.0.0.qualifier
Bundle-Vendor: VOGELLA
Automatic-Module-Name: com.vogella.contribute.parts
Bundle-RequiredExecutionEnvironment: JavaSE-11
Require-Bundle: org.eclipse.core.runtime,
 org.eclipse.jface,
 org.eclipse.e4.core.di,
 org.eclipse.e4.ui.workbench,
 org.eclipse.e4.ui.di
Import-Package: javax.annotation
8.3. Create a part implementation : part 구현체 만들기
아래의 AdditionalInformationPart class를 만드세요
package com.vogella.contribute.parts;

import javax.annotation.PostConstruct;

import org.eclipse.swt.SWT;
import org.eclipse.swt.widgets.Composite;
import org.eclipse.swt.widgets.Text;

public class AdditionalInformationPart {
    @PostConstruct
    public void postConstruct(Composite parent) {
        new Text(parent, SWT.BORDER | SWT.MULTI);
    }
}
8.4. Create a model fragment : model fragment 만들기
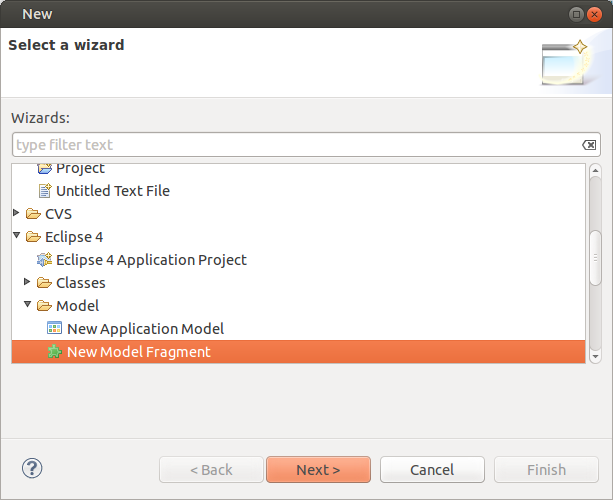
메뉴의 File > New > Other…> Eclipse 4 > Model > New Model Fragment를 따라서, 새 model fragment를 만드세요

container에 contribute.parts 를 선택하고, fragment.e4xmi를 파일명으로 설정하세요.
존재하지 않는 이미지입니다.
Finish 버튼을 누르세요
8.5. Validate that the fragment is registered as extension
: fragment가 extension에 등록되었는지 검증하기.
fragment 생성 마법사는, 당신의 contribute plug-in에 org.eclipse.e4.workbench.mode를 같이 추가합니다. plugin.xml 파일을 열어 확인 할 수 있습니다.
아이디어 : 만약, plugin.xml 파일이 없다면, MANIFEST.MF 파일을 여세요. overview 탭을 선택 후 Extensions link를 클릭합니다. 이 탭에서 extension을 일단 추가하면, plugin.xml이 생성되는 것을 확인 할 수 있습니다.
Extension 탭의 apply field가 always로 설정되었는지 확실히 하세요.
항목들이 아래 screenshot 처럼 되어있어야 합니다:

아이디어 : 만약 plugin.xml의 항목이 없다면, [add..] 버튼을 눌러 생성할 수 있습니다. 이후 org.eclipse.e4.workbench.model의 extension point에 대한 새 extension을 추가하세요. 이 항목이 일단 만들어 지면, 우클릭을 사용해 extension에 fragment를 추가할 수 있습니다.
plugin.xml의 결과는 아래의 code와 비슷하게 나와야 합니다.
<?xml version="1.0" encoding="UTF-8"?>
<plugin>
   <extension
         id="com.vogella.contribute.parts.fragment"
         point="org.eclipse.e4.workbench.model">
      <fragment
            apply="always"
            uri="fragment.e4xmi">
      </fragment>
   </extension>
</plugin>
8.6. Adding model elements : model elements 추가하기
fragment.e4xmi 파일을 자체 editor로 여세요. Model Fragments node를 선택 후 add 버튼을 누르세요
존재하지 않는 이미지입니다.
xpath:/를 extended element id로, descriptors를 feature name으로 설정하세요.
존재하지 않는 이미지입니다.
이 항목에 우클릭을 한 후, Add Child PartDescriptor를 선택하세요.
Part Descriptor를 선택하고 Class URI필드의 find 버튼을 누르세요.
AdditionalInformationPart class를 선택하세요
존재하지 않는 이미지입니다.
생성된 항목은 아래 코드처럼 나와야 합니다 :
bundleclass://com.vogella.contribute.parts/com.vogella.contribute.parts.AdditionalInformationPart
이제 Supplementary 탭으로 이동 후 아래 태그를 추가하세요 : View
존재하지 않는 이미지입니다.
정보 : View 태그는 Eclipse IDE가 이 part descriptor를 확실히, 유효한 view로 accept하게 만듭니다. 당신이 Eclipse IDE에서 이 plug-in을 사용한다면 말입니다. 순수한 e4 RCP application에서는 이 flag가 필요하진 않습니다.
아이디어 : Add 버튼 누르는걸 까먹지 마세요. add 버튼 누르고 text를 입력하세요.
8.7. Update product : product 업데이트
새 plug-ins를 당신에 feature에 넣고, product 파일을 통해 start 하세요.
8.8. Validate : 검증
Eclipse IDE에서 Window > Show > View > Other… > dialog 를 통해 additional part를 open 할 수 있습니다.
runtime application에 Eclipse model spy를 추가하고, part descriptor를 볼 수 있는지 확인하세요. 선택적으로 이 part descriptor를 기반으로 한 새 part를 open 할 수있는 new handler를 생성할 수 있습니다.
8.9. Introduction to dependency injection : dependency injection 소개
9장에서 이어집니다.