4. Describing the structure of an Eclipse application
: (Eclipse application 구조 설명)
- runtime에서, Eclipse application 구조는 application model로 설명됩니다.
- 이 모델은 individual model elements인 application의 부분과, 그 계층 관계를 포함합니다.
- 몇몇은 user 눈으로 확인 할 수 있습니다.
ex) window, parts(view & editor), menu, toolbar...
- 다른 element는 직접적으로 user에게 보이지 않습니다.
ex) handler, commands, key bindings....
- 각 model element는 attributes를 가지고 있습니다. 이 attributes는 스스로의 현재 상태를 describe합니다.
ex) size, window에서 'position'
- application model은 계층(hierarchy)를 통해, model element들의 관계 또한 표현합니다. 필요하다면, model element는 Java class 나 static resource로 연결을 포함합니다.
ex) 'part'는 Java class들로의 연결을 포함합니다. Java class들은 'part'가 보여질(visible) 때 초기화 됩니다.
- application model의 base는 static file로 보통 정의되어 있습니다.
RCP application에서 이 파일은, 기본적으로 Application.e4xmi 로 불립니다. 그리고 plug-in의 main directory에 위치해 있습니다. 이 디렉토리는 product extension을 정의하는 곳이기도 합니다.
- Eclipse IDE는 자체적인 base application file이 포함되어 있습니다.
이 파일은 application의 시작에 read되고, 초기(initial) application model을 구성할 때 사용합니다.
- model에 대한 변경 사항은 유지됩니다. 만약, 변경된 model이 있는 경우, 다음에 시작할 때, application은 이 모델로부터 복원(restored)됩니다.
- application model은 확장 가능 합니다.
ex) 다른 plug-ins이 model processors and model fragments를 통해 application model에 기여(contribute) 할 수 있습니다.
- startup 하는동안, Eclipse framework는 application model에 대한 사용가능한 정보를 parsing합니다.(Application.e4xmi, 유지되는 user 변경사항과 model contributions) Eclipse framework는 runtime 동안, 사용가능한 정보와 그들의 hierarchy를 Java object에 저장합니다.
이 object들은 model object라고라고 하며, runtime 시기에, model element의 attribute를 나타냅니다. 또한, Eclipse IDE runtime 또는 호환성 모드(compatibility mode)에서 실행되는 Eclipse RCP 애플리케이션은 plugin.xml을 통한 view contribution과 같이 3.x API를 기반으로 이 model에 element를 추가합니다.
4.1. Connecting model elements to classes and resources
: model elements를 class와 resource에 연결하기
model elements는 URI (Uniform Resource Identifier)를 통해 class 또는 static resource를 가리킬 수(point) 있습니다.
이를 위해, Eclipse는 2가지 URI 패턴을 정의합니다. Eclipse는 대부분의 case에서, 참조 된 objects 또는 resource를 lazy하게 instantiates합니다. ex) 'part'의 class는 'part'가 보여질(visible)때 instantiated됩니다.
아래의 표는 지원하는 URI 패턴을 나타냅니다. 이 예제에서는 bundle이 shortname을 가지도록, bundle을 'test'라고 명명합니다.
Table 1. URI pattern for class and static file references
: 표1. class의 URI 패턴과 static file reference들
|
Pattern
|
Description
|
|
bundleclass://Bundle-SymbolicName/package.classname
Example: bundleclass://test/test.parts.MySavePart |
Identifier for a Java class. It consists of the following parts: bundleclass:// is a fixed prefix. Bundle-SymbolicName is defined in MANIFEST.MF file. The Bundle-SymbolicName is followed by a '/' and the fully qualified classname.
|
|
platform:/plugin/Bundle-SymbolicName/path/filename.extension
Example: platform:/plugin/com.example.plugin/icons/save_edit.gif |
Used to identify resources. Identifier for a resource in a plug-in. platform:/plugin/ is a fixed prefix, followed by the Bundle-SymbolicName, followed by the path to the file and the filename.
|
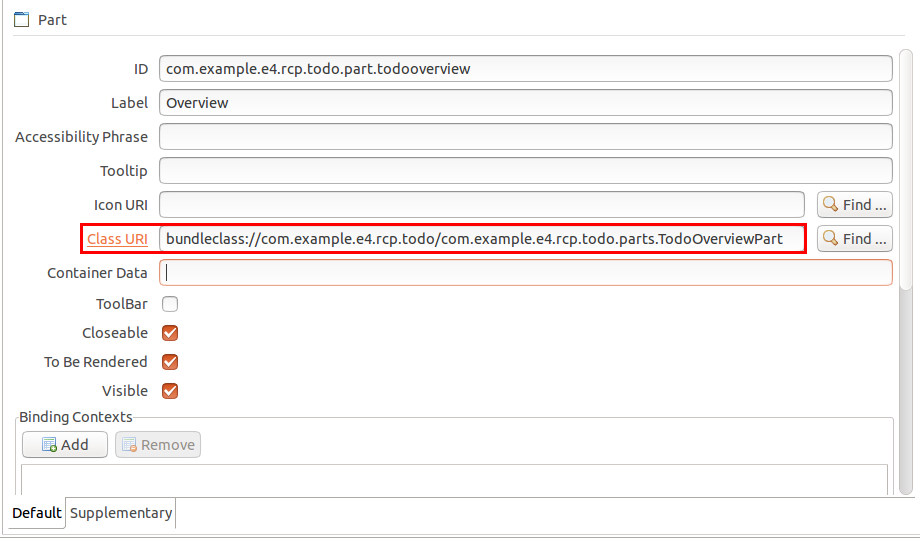
예를 들어, 'part'에는 bundleclass:// URI를 통해 Java class를 가리키는(point) Class URI attribute가 있습니다. 이 class는 'part'의 구체적인(concrete) 구현(implementation)을 제공합니다.
static resource reference의 예로는 'part'의 Icon URI attribute가 있습니다. 이 attribute는 part에 사용되는 icon을 가리킬(point) 수 있습니다.
정리
패턴1(class URI)
=> bundleclass://test/test.parts.MySavePart
prefix로 "bundleclass://" 가 고정, Bundle-SymbolicName은 MANIFEST.MF 파일에 define되어 있음. Bundle-SymbolicName뒤에는 /와 정규화된(qualified) 클래스 이름이 따라옵니다.
패턴2(static file resource)
=> platform:/plugin/com.example.plugin/icons/save_edit.gif
resource를 식별(identify)하는 데 사용됩니다. plug-in내의 resource 식별자입니다. platform:/plugin/은 prefix로 고정이고, Bundle-SymbolicName이 뒤따라 옵니다. 여기에, 파일 경로 및 파일 이름이 뒤따라옵니다.
4.2. Overview of the model objects : model object 개요
이 내용은, application model에서 사용 가능한 model element에 대한 개요입니다.
4.2.1. Application
"Application 개체"는 런타임에 MApplication 개체로 표시되며, 또한 application의 root입니다.
4.2.2. Window
Eclipse application은 하나 이상의 window로 구성되며, model representation은 MWindow 또는 MTrimmedWindow 개체입니다. MTrimmedWindow는 trimbar(toolbar를 포함 할 수 있는)를 포함 할 수 있습니다.

4.2.3. Parts
Parts는 User interface components 입니다. 이것은 data를 조작하고 안내(navigate)합니다. 이것의 model representation은 MPart 입니다. Parts는 서로 붙어서 stacked되거나 positioned 됩니다. 이것은 parts가 놓여진 container에 depend 됩니다. part는 drop-down 메뉴, context menu, toolbar를 가질 수 있습니다.

Parts는 views와 editors로 분류될 수 있습니다.
Views는 보통 data의 set을 display하거나, modify 합니다. data elements의 table의 tree처럼 말입니다.
만약, view가 data의 변경을 허용하면, 보통, 이 변경은 save 필요없이, 해당 data structure에 바로 apply 됩니다.
예를 들어, Eclipse IDE 안의 Project Explorer view는 당신이, set of file을 탐색하는 것을 허용합니다. 만약, 당신이 Package Explorere를 통해서 파일명을 변경한다면, 파일 명은 바로 file system 상에서 변경됩니다.
Editors는 보통 1개의 data element 변경에 사용됩니다. 변경을 apply 하기 위해선, user가 명시적으로 editor content를 save 해야 합니다.
예를 들어, Java editor가 java source file 변경에 사용됩니다.
source file의 변경은 user가 save버튼을 선택한 경우에 한번 apply 됩니다. 지저분 해진(dirty) 편집기 탭에는, asterisk(*)마크가 파일명에 표시됩니다.

4.2.4. Available part containers : 사용가능한 part container
Parts는 window나 perspective에 바로 접근할 수 있습니다. parts는 stack(Part Stack)이나 sash container(Part Sash Container)로 grouped 되고, arraged 될 수 있습니다.
Part stack은 browser 처럼 그것의 childeren을 arrange합니다. parts의 묶음을 포함하고, 1개의 part의 content가 표시 될 동안,그들의 headers를 보여줍니다.
user는 상응하는 tab을 선택하여, 다른 part로 switch(전환)할 수 있습니다.
part sash container는 이것의 모든 children을 표시합니다, 이때 children은 수평, 혹은 수직으로 정렬됩니다.
아래의 screenshot에는 simple한 Eclipse application layout이 있습니다. 여기에는 2개의 part sash container와 3개의 part stack이 있습니다.

이 layout의 맨 위는 part sash container 입니다. 다른 part sash container와 1개의 part stack이 포함됩니다. 이 2개의 elements는 나란히 나타나고 있습니다. 다음 level에 있는 part sash container는 2개의 part stack을 가지고 있습니다. 이 hierarchy는 아래 그림에 표현되어 있습니다.

PartSashContainer(밑바탕) 하위에 Part Stack(왼쪽)과 Part Sash Container(오른쪽)가 있다. Part Sash Container(오른쪽)에는 Part Stack 2개가 있다.
당신은 layout weight을 assign하기 위해 PartSashContainer의 Container Data 속성을 사용할 수 있습니다. 이 layout weight은 relative space로 해석됩니다. 이 relative space에 상응하는 child element는 part sash container에 할당받아야 합니다. 이 세팅은 아래 screenshot에 나와 있습니다.
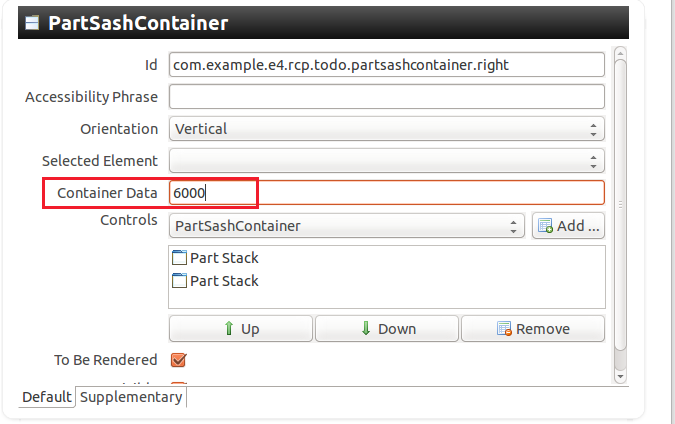
만약 당신이 Container Data를 1개의 element에 설정하면, 다른 모든 element에 대해서도 정의해야만 합니다. 바꿔말하면, 값이 없는 것은 매우 크게 해석되어 다른 elements가 모든 사용가능한 space를 차지하게 됩니다.
Tip : 초기의 container data value의 총합은 유지된다, sash의 element가 이동할 때,
이것 total을 미세하고 부드럽게 dragging 하려면, total이 화면 해상도와 비슷해야 합니다. 너무낮은 값은(ex 50/50) sash unit당 여러 pixel씩 이동하는 것을 유발합니다. 이것은 사용자로 하여금 덜컥거리는 움직임으로 인식하게 합니다. 해서, 충분히 높은값(ex 10000)을 사용하십시오.
4.2.5. Perspective
perspective는 다른 part container와 part를 위한 부수적인 container입니다.
이것은 MPerspective 개체로 표현됩니다. 이것은 MPerspectiveStack 개체에 있어야합니다. 오직 하나의 Perspecitve 만이 perspective stack에 있을 수 있고, 활성화 됩니다. perspective간에 element는 share가 가능합니다.
예를들어, Eclipse IDE는 개발 혹은 디버깅 같은, 다른 작업을 위한, 적절한 view arrangement를 제공하기 위해 perspecive를 사용합니다.
perspecive 전환은 Eclipse platform이 제공하는 EPartService를 통해 가능합니다.
4.2.6. Other available model objects
: 다른 사용가능한 model object들
이어지는 표에는 중요한 model object 종류가 나열되어 있습니다.
Table 2. Eclipse model elements
|
Model element
|
Description
|
|
MApplication
|
Describes the application object. All other model elements are contained in this object.
|
|
MAddon
|
A self-contained component typically without user interface. It can register for events in the application life cycle and handle these events.
|
|
MWindow
|
Represents a window in your application.
|
|
MTrimmedWindow
|
Similar to MWindow but it allows containing toolbars for the windows (via the TrimBars model elements).
|
|
MPerspective
|
Represents a different layout of parts to be shown inside the window. Should be contained in a MPerspectiveStack.
|
|
MPart
|
Represents the model element part, e.g., a view or an editor.
|
|
MDirtyable
|
Property of MPart which can be injected. If set to true, this property informs the Eclipse platform that this Part contains unsaved data (is dirty). In a handler you can query this property to provide a save possibility.
|
|
MPartDescriptor
|
MPartDescriptor is a template for new parts. A new part based on this part descriptor can be created and shown via the Eclipse framework.
|
|
Snippets
|
Snippets can be used to pre-configure model parts which you want to create via your program. You can use the Eclipse framework to clone such a snippet and use the result object to attach it to the application model at runtime.
|
'Automotive > EclipseRCP' 카테고리의 다른 글
| Eclipse RCP (Rich Client Platform) - 6.실습: Eclipse RCP application 만들기 + 7. (0) | 2022.01.21 |
|---|---|
| Eclipse RCP (Rich Client Platform) - 5.다른 plug-ins으로 부터 application model 확장하기 (0) | 2022.01.21 |
| Eclipse RCP (Rich Client Platform) - 3.마법사를 통해 RCP application 만들기 (0) | 2022.01.21 |
| Eclipse RCP (Rich Client Platform) - 2.설치 (0) | 2022.01.21 |
| Eclipse RCP (Rich Client Platform) - 1.소개 (0) | 2022.01.21 |